
Introduction
Whisper is a cutting-edge automatic speech recognition (ASR) system that has been meticulously
trained on a massive 680,000 hours of multilingual and multitask supervised data sourced from the
web. The
exceptional size and diversity of this dataset result in enhanced robustness to various factors such
as
accents, background noise, and technical language. Additionally, the system’s capabilities extend
beyond
transcribing speech in multiple languages to include translation of those languages into English. To
promote
useful applications and encourage further research on robust speech processing, the models and
inference code
have been made open-source.
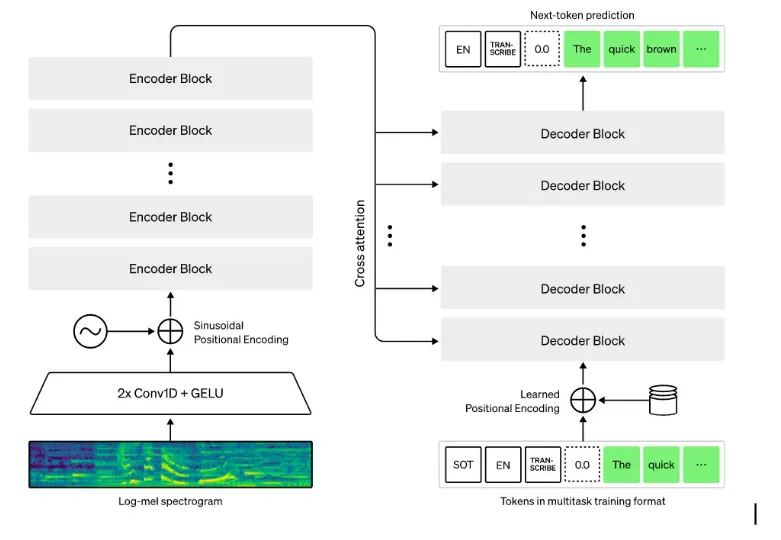
The Whisper architecture is a simple end-to-end approach, implemented as an encoder-decoder
Transformer. Input
audio is split into 30-second chunks, converted into a log-Mel spectrogram, and then passed into an
encoder. A
decoder is trained to predict the corresponding text caption, intermixed with special tokens that
direct the
single model to perform tasks such as language identification, phrase-level timestamps, multilingual
speech
transcription, and to-English speech translation.
Let’s get our hands dirty!
How to use whisper with command line
If you want to use the Whisper command line interface (CLI) on your local machine, there are a
few prerequisites that you need to install first. Specifically, you’ll need to have Python, PyTorch,
and
FFmpeg installed on your system. Here’s how you can get started:
-
To install Python, head
over to the official Python website using the link below and follow the installation
instructions provided. -
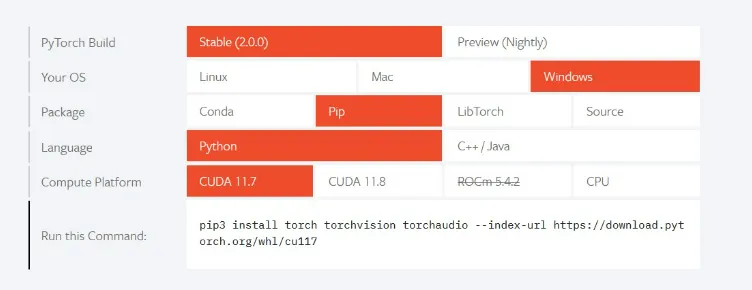
Next, you’ll need to install PyTorch. To
do this, visit the PyTorch website using the link below and obtain the pip install command that
corresponds to your system’s compute platform.
- Finally, you’ll need to install
FFmpeg. To do this, you can visit the FFmpeg website using the link below and follow the
installation instructions provided. -
Alternatively, if you’re a Windows user, you can download and install the Chocolatey package
manager using the
link below. Once installed, use the command “choco install ffmpeg” to install FFmpeg on your
system.
choco install ffmpeg
Now that you have Python, PyTorch, and FFmpeg installed, you’re ready to install Whisper itself.
Simply run
the following command to install the latest version of the package:
pip install -U openai-whisper
Assuming that you have all your audio files in a single folder, here’s how you can use the Whisper
command
line interface to transcribe them:
- First, navigate to the folder that contains all your audio files.
- Open the command prompt in that folder.
- To transcribe a specific audio file, simply run the following command:
Note: First run will take a minute as it has to download the base model
whisper "file name"
Note that by default, Whisper will use the base model to transcribe the audio file. If you want to
use a
different model (tiny, base, small, medium, large ), you can specify it using the –model
argument. For
example, to use the medium model, you would run the following command:
whisper "file name" --model medium
Users can manually enter the language, if known.
whisper "file name" --language English

To see all the available options and commands for Whisper, you can run the following command:
whisper -help
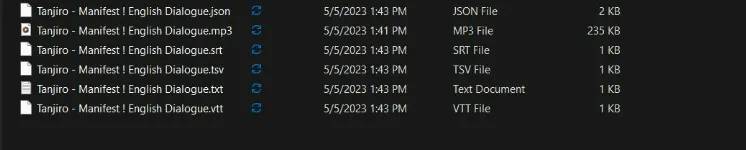
Once file is transcribed, whisper will provide transcribed files in different formats like json,
srt, tsv, txt
and vtt
Find the original audio and the transcribed files in the link below.
Audio file:
Audio
File
Transcribed text file:
Transcribed
text
Transcribed JSON file:
Transcribed
JSON
Why whisper when you can use Whisper? It’s like having a language interpreter for your inner
thoughts – minus
the awkward misunderstandings.
Stay tuned for the next post where we’ll explore how to integrate Whisper into your Python programs.
With
Whisper’s powerful automatic speech recognition capabilities, the possibilities are endless!