


Akash
Engineering Lead
Welcome to the enthralling universe of Generative AI! Recognized as a realm of artificial intelligence algorithms with the magic to conjure fresh content based on available data, this technology has unassumingly become the new frontier for a plethora of industries, including tech, banking, and media. And, no surprises here, the technological world has openly embraced it in myriad innovative ways.
Let's talk about the recent sensation that has been taking the digital world by a storm: ChatGPT. An innovation by OpenAI, this AI-powered chatbot, which enjoys robust backing from notable investors like Microsoft, boasts of advanced conversational capabilities that have caught the world's attention. The technology has been smoothly integrated into Microsoft's Bing search engine and Edge browser, with further plans to weave it into “every layer of the stack,” as revealed by CEO Satya Nadella.
The narrative took a new twist in March 2023 when OpenAI introduced GPT-4, the latest in the ChatGPT software series, currently available to a circle of subscribers and developers. And the competition is heating up! Alphabet, for instance, is on the brink of launching a conversational AI service, aptly named Bard.
A Peek into Privacy Concerns with OpenAI
However, when dealing with sensitive data, we wade into a more complex scenario. Imagine your medical history or bank account details being accessible - these are elements that most of us prefer to cloak under a veil of privacy. The corporate world is no stranger to this necessity either, where sensitive data, like proprietary research data, needs to be handled with kid gloves.
A few headlines to ponder:
ChatGPT under investigation by Canadian privacy watchdog
Germany considers following Italy in banning ChatGPT
ChatGPT bug leaked payment data, conversation titles of users, confirms OpenAI
OpenAI gives in to Italy's data privacy demands, ending ChatGPT ban
Exploring the In-House Model 🏠
Here's an alternative: an in-house AI model. However, it does not come without its own set of challenges. This approach demands a devoted team of data scientists to upkeep and refresh the model, making it a resource-intensive strategy. But there's a silver lining - adopting an in-house model bestows a superior level of control over data and its processing, offering a secure option for handling sensitive data.
Yet, the dilemma persists. Re-training the data will be confined to your private dataset unless your data scientists dive into merging the LLM with updates from public sources, ensuring that the model benefits from external enhancements without transmitting any internal data outwards.
Navigating the Path to Deploy Open Source LLMs Privately
And so, we arrive at the million-dollar question: How does one deploy open source LLMs on a private network? 🔐
Generative AI applications often utilize common components like Embedding models, vector stores, and LLMs. Those tech aficionados following Bluetick Consultants' generative AI journey might have a grasp on utilizing open source vector stores and Embedding models. The enigma, however, lies in deploying LLMs while considering aspects like latency and cost.
- Step 1: Craft Your Domain and Step into the Studio
- Step 2: Open and Operate Your Notebook
- Step 3: Examine the Model and Endpoint
- Step 4: Time for Cleanup
- Step 1: Begin with Basics - Account Creation & API Key Generation
- Step 2: Navigate the “Secure Cloud”
- Step 3: Deploying the Llama 2 7B Model - Let's Get Technical with Python
1. Harnessing Amazon SageMaker's Might for LLM Deployment
Amazon SageMaker, celebrated as a fully-managed machine learning service, presents a seamless horizon where data scientists and developers can not only effortlessly build and train machine learning models but also usher them into a production-ready hosted environment. It arms you with an integrated Jupyter authoring notebook instance, ensuring smooth access to your data sources for exploration and analysis, all while liberating you from the shackles of server management. Moreover, it extends a plethora of common machine learning algorithms, optimized to perform with utmost efficiency against sizeable data in a distributed environment.
For additional information, see Amazon SageMaker developer resources.
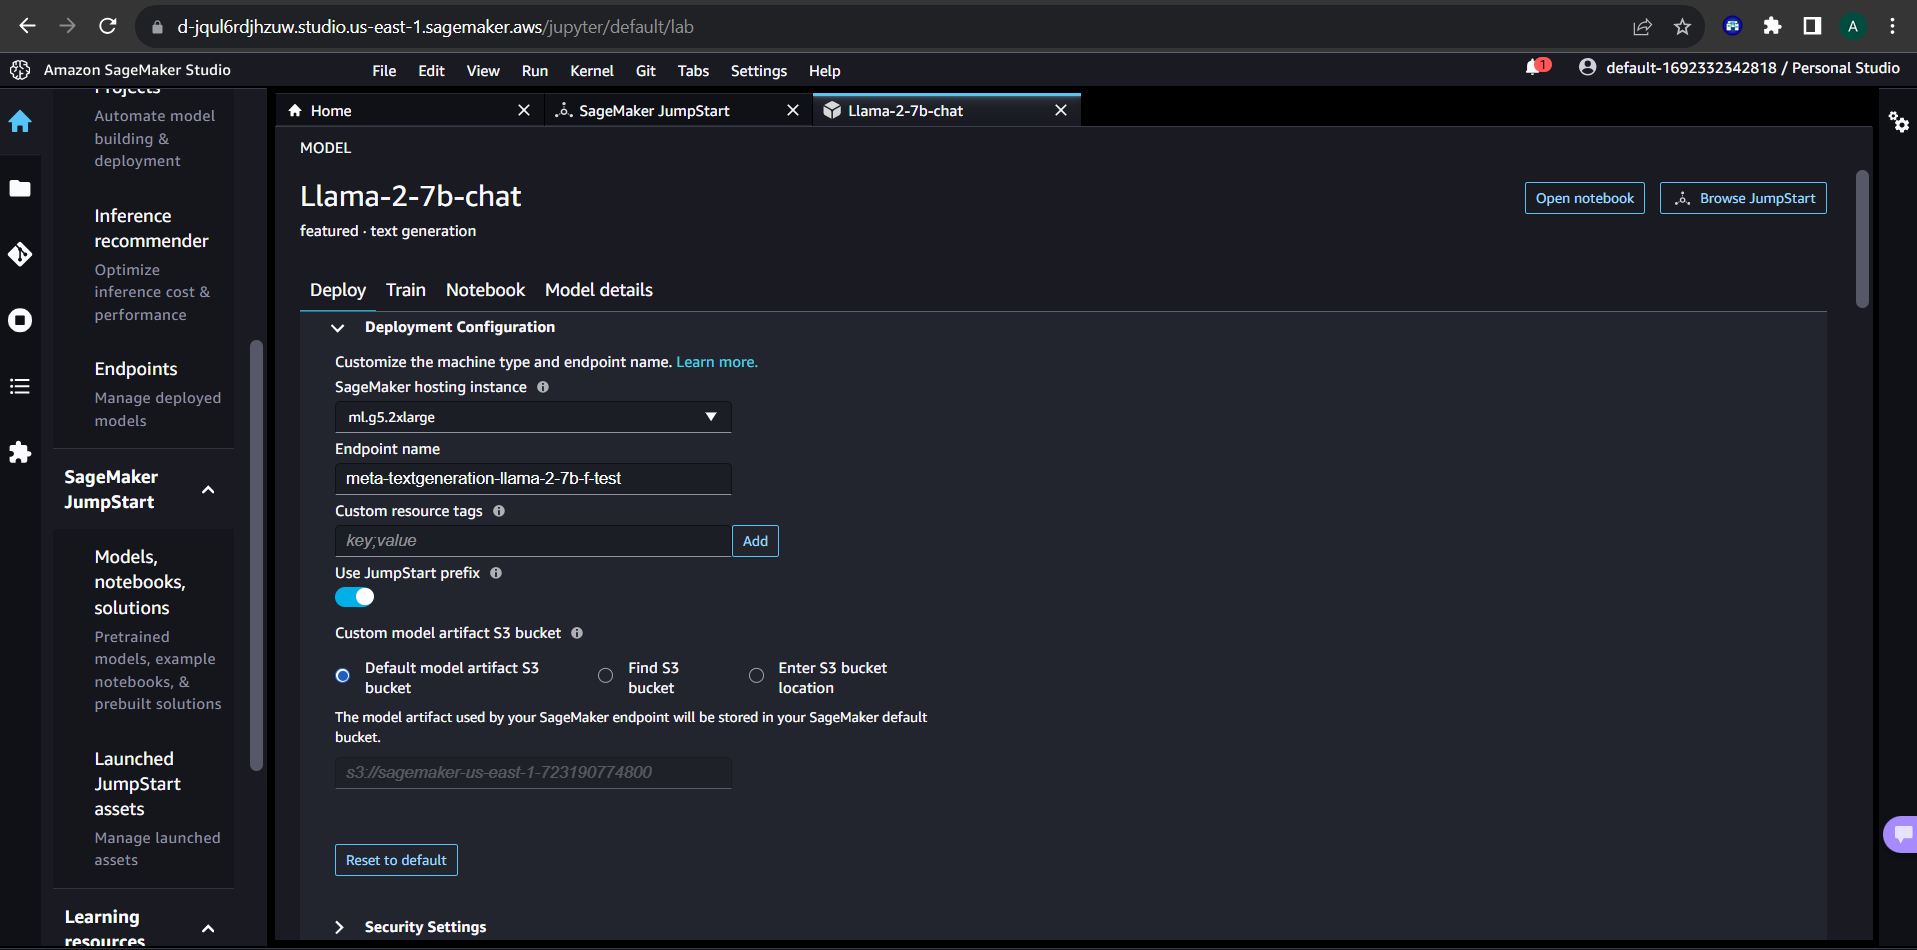
Start by creating a domain and opening the studio, navigating to the SageMaker Jumpstart option. For our journey today, we'll deploy the "llama 2 7B" model.
📌 A Quick Detour: Why the llama 2 7B model, you ask? The face-off among LLMs (GPT 3.5 Turbo, Llama 2 7B, and Falcon 7B) unfolds the story clearly. Dive into “The LLM Face-Off” to explore the nuances.
The LLM Face-Off: GPT 3.5 Turbo, Llama 2 7B, and Falcon 7B
SageMaker defaults its instance type to ml.g5.2xlarge, limiting the downgrade to versions like ml.g5.xlarge but permitting upgrades to, say, ml.g5.4xlarge or ml.g5.8xlarge to minimize latency.
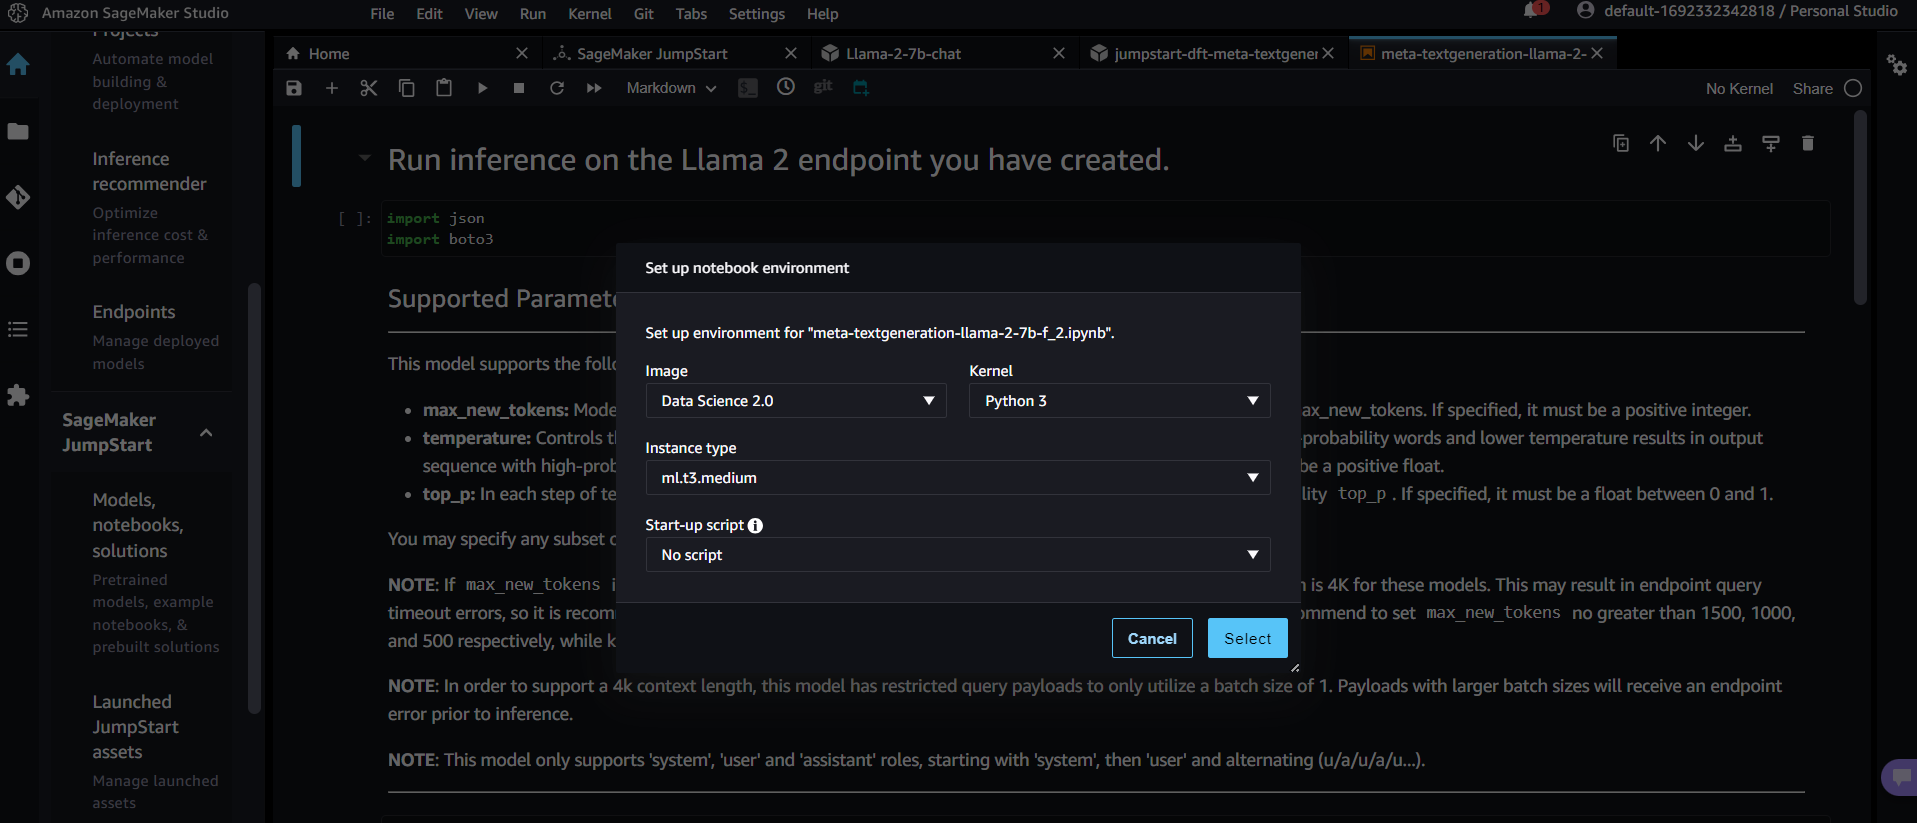
Within the SageMaker studio, initiate a notebook, each operating on an instance type, with the default being ml.t3.medium.
Ensure to turn off the studio when it's idle to conserve resources. Navigate through SageMaker's left menu, selecting “Inference.” Here, your locally deployed model, endpoint, and other configurations stand ready for exploration.
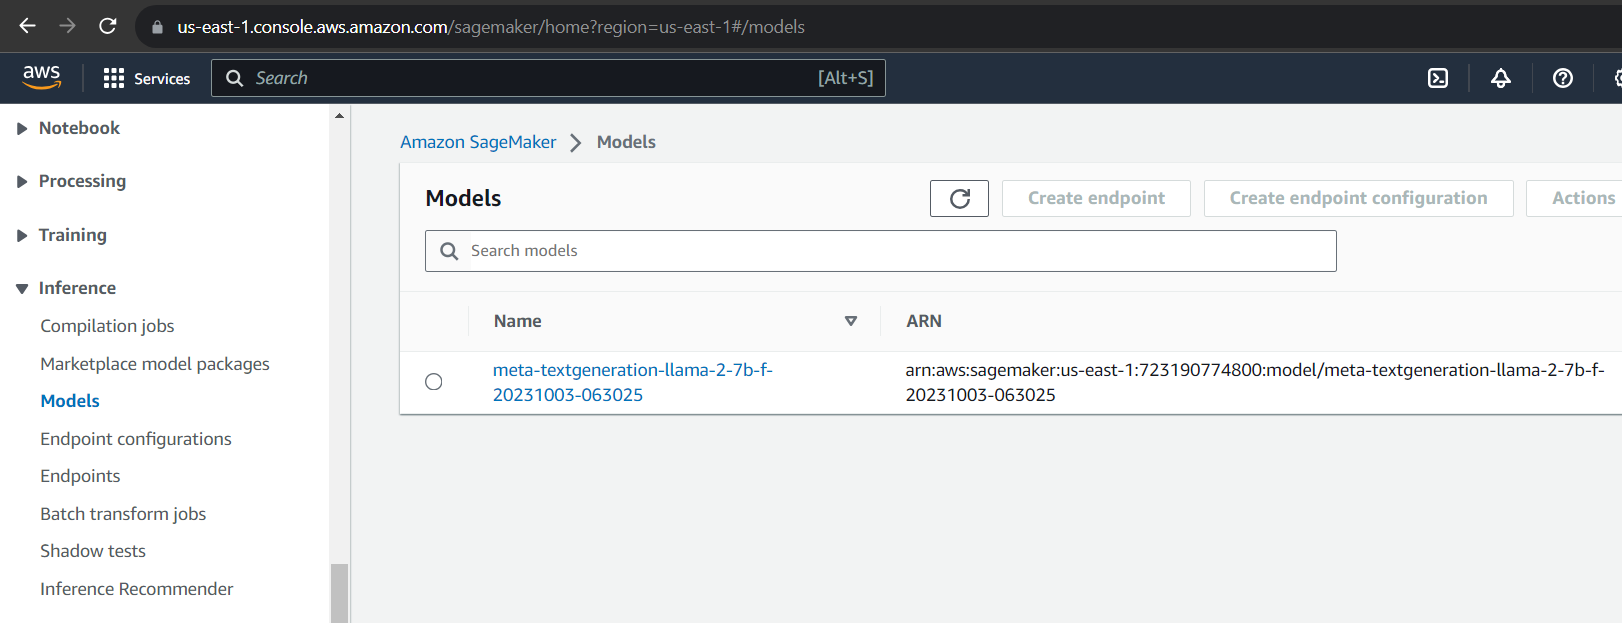
Especially crucial for those in the testing or research phases, don't overlook the cleanup. Wipe the slate clean and remove all necessary components within “Inference,” deleting both the model and endpoint.
2. Empowering Deployment with RunPod
RunPod is a cloud computing platform meticulously sculpted for AI and machine learning
applications. With offerings like GPU Instances, Serverless GPUs, and AI Endpoints, RunPod is
steadfast in its mission: making cloud computing not only accessible and affordable but also
rich in features, user-friendly, and an immersive experience. Here, we strive to arm both
individuals and enterprises with pioneering technology, unlocking the colossal potential that AI
and cloud computing bring to the table.
Embark with us on a journey to deploy the Llama 2 7B model using RunPod, ensuring every step is
unveiled, from account creation to API utilization.
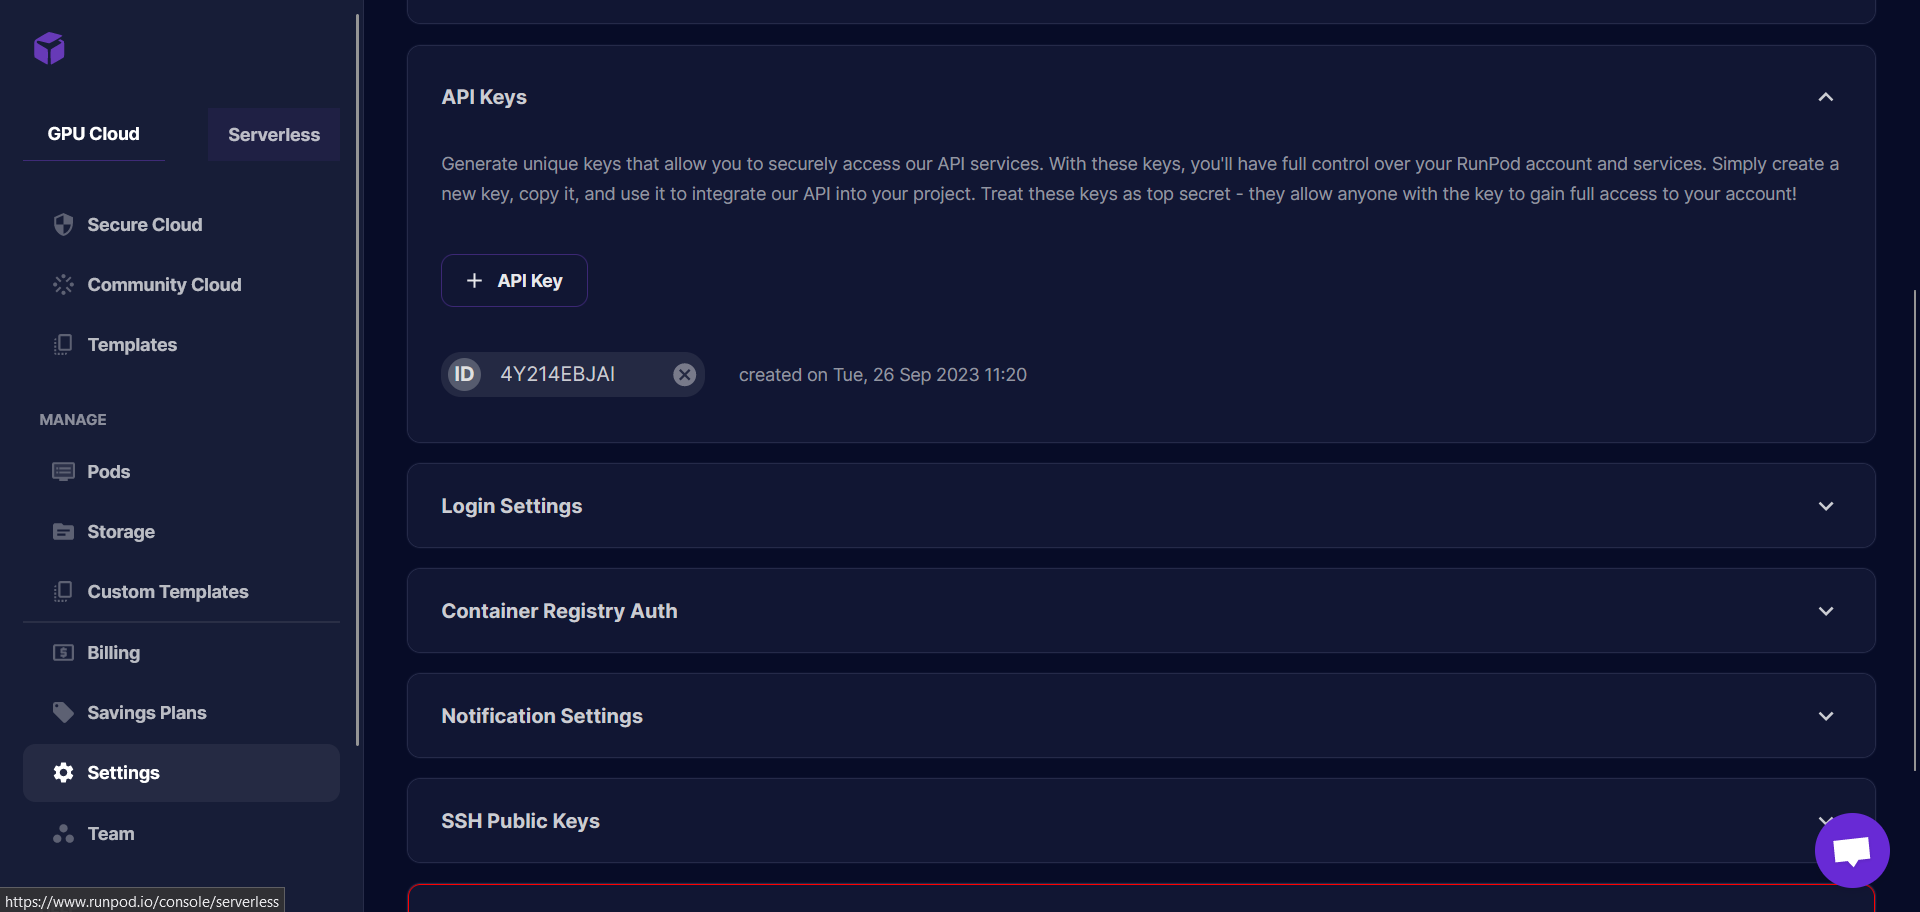
Commence by creating your RunPod account and weaving through the settings page to generate an API key. It's crucial to note that RunPod operates as a prepaid service, so let's kick things off by adding $10 to get the ball rolling.
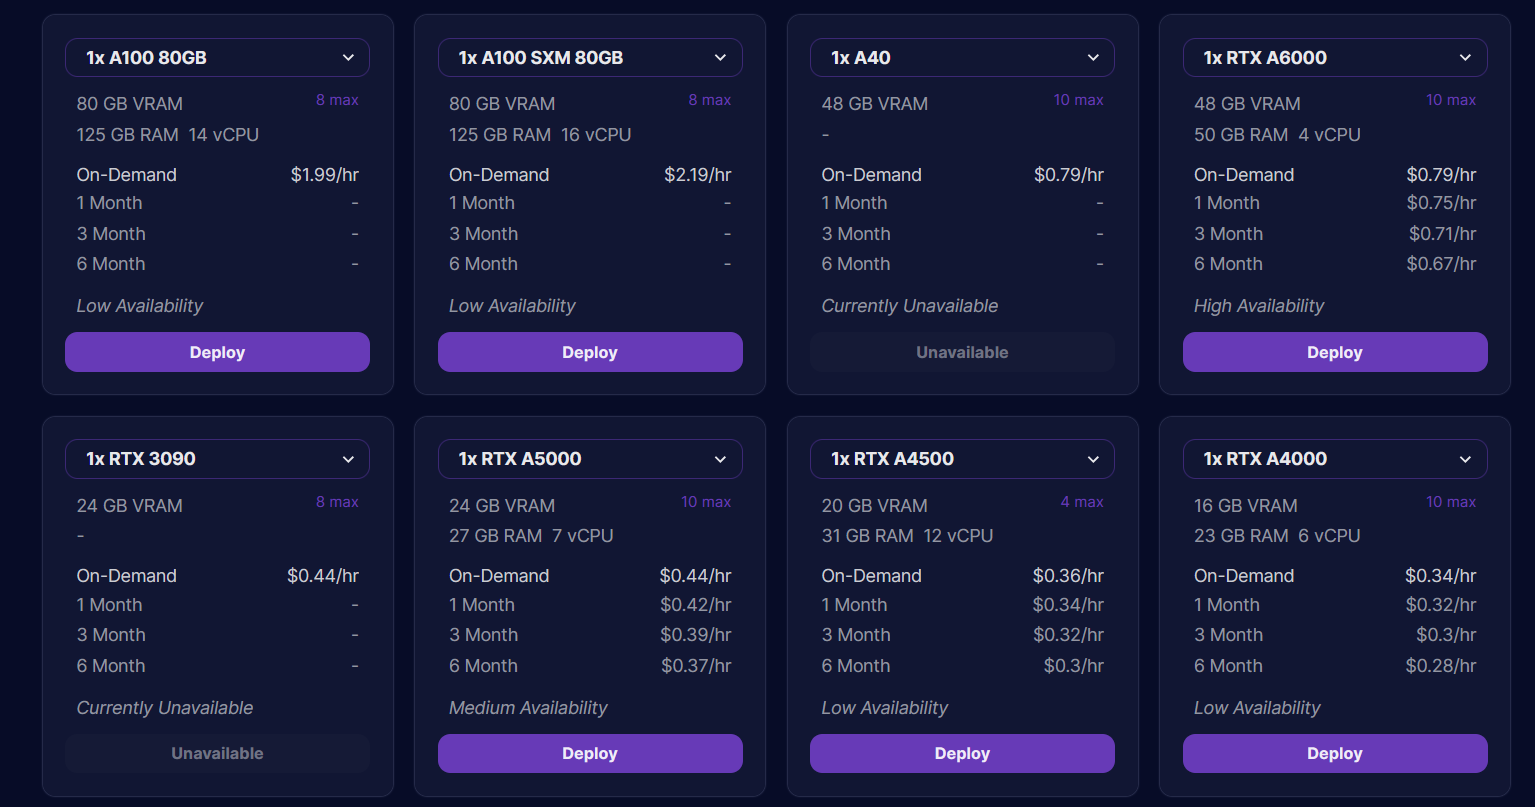
Find your way to the “Secure Cloud” tab, where you'll be greeted by a myriad of GPU servers, available with either on-demand or monthly options to cater to your specific needs.
For deploying llama 2 7B model, we'll use NVIDIA RTX A5000 GPU instance with specifications 24 GB vRAM 27 GB RAM, 7 vCPU
Now, let's get our hands a bit dirty in the codes. We will deploy the Llama 2 7B model utilizing Python and here's how we'll do it:
Install the Needed Packages:
 !pip install -quiet requests==2.31.0 --progress-bar off
 !pip install -quiet runpod --progress-bar off
Import the relevant modules
 import requests
 import runpod
Add your API key generated in step 1
runpod.api_key = "Add your Runpod API Key"
Create a pod on runpod
 gpu_count = 1

 pod = runpod.create_pod(
     name="Llama-7b-chat",
     image_name="ghcr.io/huggingface/text-generation-inference:0.9.4",
     gpu_type_id="NVIDIA RTX A5000",
     cloud_type="SECURE",
     docker_args="--model-id TheBloke/Llama-2-7b-chat-fp16",
     gpu_count=gpu_count,
     volume_in_gb=50,
     container_disk_in_gb=5,
     ports="80/http,29500/http",
     volume_mount_path="/data",
 )
To access the API via Swagger Docs, utilize the URL, as shown below.
 SERVER_URL = f'https://{pod["id"]}-80.proxy.runpod.net'
 print(SERVER_URL)
To view this source code -Source code
3. LLM Deployment on Your Private, GPU-Enabled Server! 🚀
In the world of AI and generative algorithms, the notion of privacy isn't just a luxury—it's an imperative.When privacy and control are paramount, hosting LLM models on a private server provides that extra layer of security and customization that businesses often need.
Why a GPU-Enabled Server?
GPUs (Graphics Processing Units) are designed to handle multiple tasks simultaneously. They've been the powerhouses behind the computational might needed for high-intensity tasks like deep learning. LLM models, given their intricate architecture and the vast amounts of data they process, can benefit immensely from the parallel processing capabilities of GPUs.
So, let's unravel the steps to establish this deployment.
- Step 1: LLM Model - Download It!
Begin by downloading your chosen LLM model. Ensure that the model aligns with your objectives and has been validated for its performance and reliability.
 # Define Model ID
 model_id = "TheBloke/Llama-2-7b-chat-fp16"

 # Load Tokenizer
 tokenizer = AutoTokenizer.from_pretrained(model_id)

 # Load Model
 model = AutoModelForCausalLM.from_pretrained(model_id,
 cache_dir='/opt/workspace/',
     torch_dtype=torch.bfloat16, trust_remote_code=True,
 device_map="auto", offload_folder="offload")
OR
 model_name_or_path = "TheBloke/Llama-2-7b-chat-fp16"
 model_basename = "llama-2-7b-chat.ggmlv3.q5_0.bin" # the model is in bin
 format

 model_path = hf_hub_download(repo_id=model_name_or_path,
 filename=model_basename)
- Step 2: Load Up with Tokenizer or Ctokenizer
With the LLM model in your possession, employ a Tokenizer or Ctokenizer to load it. These tools assist in preparing your text data in a format that’s comprehensible and usable for the LLM, ensuring that the model interprets the input effectively to generate desired outputs.
 from langchain.llms import CTransformers
 llm = CTransformers(
         model = model_path,
         model_type="llama",
         max_new_tokens = 512,
         temperature = 0.5
     )
OR
 pipeline = transformers.pipeline(
     "text-generation",
     model=model,
     tokenizer=tokenizer,
     device_map="auto",
     max_length=400,
     do_sample=True,
     top_k=10,
     num_return_sequences=1,
     eos_token_id=tokenizer.eos_token_id
 )
- Step 3: Bridge the Gap with a Framework
Introduce a framework that’s specifically designed to form a stable and efficient connection between the LLM and your programming language. A popular choice in this context is Langchain - renowned for its ability to seamlessly integrate LLMs with different programming languages, thereby, enabling an efficient interaction between the two.
 # Setup prompt template
 template = PromptTemplate(input_variables=['input'], template='{input}')
 # Pass hugging face pipeline to langchain class
 llm = HuggingFacePipeline(pipeline=pipeline, model_kwargs =
 {'temperature':0})
 # Build stacked LLM chain i.e. prompt-formatting + LLM
 chain = LLMChain(llm=llm, prompt=template)
Alternatively, you can build an API.
 @app.route('/generate_response', methods=['POST'])
 def generate_response():
 try:
     data = request.get_json()
     user_prompt = data['user_prompt']

     # Generate a response using LLMChain
     response = LLM_Chain.run(user_prompt)

     return jsonify({"response": response})

 except Exception as e:
     return jsonify({"error": str(e)}), 500
Eager to explore more? Dive deeper with the following resources where similar deployments have been carved out meticulously:
Falcon LLM in Action: A Step-by-Step Tutorial
Exploring Llama 2: From Installation to Interaction
In these resources, you'll find a treasure trove of insights, strategies, and step-by-step guidelines to navigate the exciting world of LLM deployments.
Pricing
Ah, pricing! The crucial decider when it comes to choosing a platform for deploying your LLM. As your guide through the terrain of LLM deployments, we're here to dissect the costs related to deploying open-source LLMs using different cloud platforms, ensuring that your AI adventures don't burn a hole in your pocket.
Let's delve into the nitty-gritty by comparing the pricing, specification, and latency across different platforms:
8 vCPU
32 GiB Memory
$1.515 /hour
$1090 /month
$0.44 /hour
$316 /month
13 vCore
40 GiB memory
$727 /month
| Cloud Service | Instance Type | Specification | Latency | Cost |
|---|---|---|---|---|
| SageMaker | ml.g5.2xlarge |
Accelerated Computing 8 vCPU 32 GiB Memory |
1 to 2 secs |
On Demand $1.515 /hour $1090 /month |
| RunPod | NVIDIA RTX A5000 | 24 GB vRAM 27 GB RAM, 7 vCPU | 2 to 3 secs |
On Demand $0.44 /hour $316 /month |
| OVHcloud | ai1-le-1-GPU |
NVIDIA Tesla V100S 32 GiB 16.4 TFLOPS 13 vCore 40 GiB memory |
- |
$1.01 /hour $727 /month |
Choosing the right platform essentially boils down to balancing your budget against your need for speed (latency) and computational power (specifications). It's imperative to ponder upon:
- Will the latency impact user experience?
- Is the computational power sufficient to manage the workload?
- Does the cost align with your budget allocations?
Always ensure to factor in additional costs like data transfer, storage, and potential overage charges to get a holistic view of your total expenditure.
Conclusion
Embarking upon the intricate pathways of deploying LLMs leads us to the intersection of innovation, pragmatism, and prudent financial planning. With each model we deploy, a new chapter of digital communication unfolds, steering us toward a future where our virtual interactions are increasingly sophisticated, personalized, and secure. It's vital to remember that every algorithm we bring to life in the silent depths of our private networks not only empowers our digital endeavors but also holds the mirror to our ethical and strategic choices in the enthralling realm of Generative AI.
“In every byte of data, there's a story yet to be told; let's write it wisely, let's write it boldly.”