


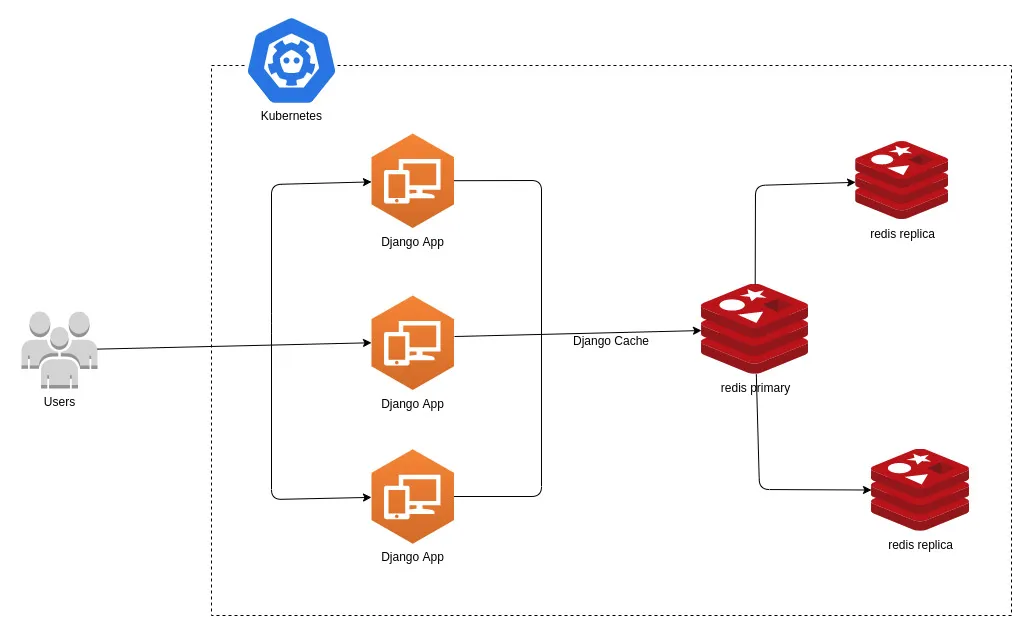
We'll take you through how to deploy a multi-tiered web application. Using redis and Django_cache to perform caching for the django application.
Open your terminal window then run the command:
git clone https://github.com/bluetickconsultants/django-multi-tier-kubernetes.git
Below are the steps that we'll be using to deploy a complete web app and test the Load of application. This blog will deploy a broken application and we'll be fixing the Kubernetes YAML documents to make the deployment successful. the application will query from the database and return data, but subsequent calls to the URL will bypass the database and query from the cache since the data is already available in the cache.
Deploy a Redis Database:
You will:
- Deploy a new namespace for your application
- Deploy a Redis server into the new namespace
- Review the objects that you've deployed with Kubernetes (deployments, pods)
- Get logs from the deployed resources via kubectl
You'll first need to provision a namespace. A namespace is a way to segment and bucket objects that you're provisioning in the Kubernetes API. You can check the existing namespaces by running:
kubectl get namespace
We are going to create a new namespace:
$ cd django-multi-tier-kubernetes && cd k8s
kubectl apply -f namespace.yml
The -f flag signifies you're going to pass a file to kubectl for it to submit to the Kubernetes API. You can run your get namespace command to see what you've created.
$ kubectl apply -f namespace.yml
namespace/django-multi-tier created
You can run your get namespace command to see what you've created.
  $ kubectl get namespaces
  NAME              STATUS   AGE
  default           Active   81m
  django-multi-tier Active   73s
  kube-node-lease   Active   81m
  kube-public       Active   81m
  kube-system       Active   81m
First Tier Web Application: Redis
You'll now deploy the first tier of the web application starting with your stateful back-end that stores state for the webapp. kubectl allows you to take a series of YAML files, put them in a folder and run kubectl apply -f against an entire folder. It will provision all of the resources and objects defined underneath the folder.
This allows you to create a grouping of objects and mini-YAML files instead of having a single YAML file with a thousand lines defining everything.
You'll first roll out the back-end tier of this multi-tier web application - an HA Redis implementation. To have a look around, you can run ls -l redis-app/
You'll now apply your YAML definitions to the cluster. Run:
kubectl apply -f redis-app/
This command went through all the files reviewed above and created objects for each one of them.
  $ kubectl apply -f redis-app/
  deployment.extensions/redis-primary created
  service/redis-primary created
  deployment.extensions/redis-replica created
  horizontalpodautoscaler.autoscaling/redis-replica created
  service/redis-replica created
  networkpolicy.networking.k8s.io/redis created
Now you'll want to read those objects and get data on what's running.
kubectl -n django-multi-tier get pod
You'll see you have two pods running - A Redis primary and replica.
  NAME                             READY   STATUS    RESTARTS   AGE
  redis-primary-684c84fc56-57brt   1/1     Running   0          75s
  redis-replica-d64bd9565-zn7sg    1/1     Running   0          74s
Now take the same step for the deployments:
kubectl -n django-multi-tier get deployments
You'll see information about your deployments—the Redis replica, redis primary, the desired count of 1, current 1, up to date, what's available and the age of the pod.
  NAME            READY   UP-TO-DATE   AVAILABLE   AGE
  redis-primary   1/1     1            1           2m37s
  redis-replica   1/1     1            1           2m36s
If you are doing a rolling deployment, you’ll see more interesting information here about the state of an application.
You can also look at services by running:
kubectl -n django-multi-tier get services
Here you can see the two services—the primary and replicas.
  NAME            TYPE        CLUSTER-IP   EXTERNAL-IP   PORT(S)    AGE
  redis-primary   ClusterIP   10.10.5.18                 6379/TCP   5m35s
  redis-replica   ClusterIP   10.10.13.85                6379/TCP   5m34s
Both of these services are clusterIP services (i.e. only available on the IP that’s internal to the cluster). You’ll also see the IPs and some info on ports and age. If you wanted to summarize in a single command, you run:
kubectl -n django-multi-tier get deployments,pods,services
This allows you to show all the resources in a single image.
  NAME                                  READY   UP-TO-DATE   AVAILABLE   AGE
  deployment.extensions/redis-primary   1/1     1            1           6m42s
  deployment.extensions/redis-replica   1/1     1            1           6m41s

  NAME                                 READY   STATUS    RESTARTS   AGE
  pod/redis-primary-684c84fc56-57brt   1/1     Running   0          6m42s
  pod/redis-replica-d64bd9565-zn7sg    1/1     Running   0          6m41s

  NAME                    TYPE        CLUSTER-IP   EXTERNAL-IP   PORT(S)    AGE
  service/redis-primary   ClusterIP   10.10.5.18                 6379/TCP   6m42s
  service/redis-replica   ClusterIP   10.10.13.85                6379/TCP   6m41s
Working through these steps, you should now see a healthy redis master and replica in the django-multi-tier namespace in Kubernetes.
Deploying the Django App
Next you will:
- Deploy the web app into the default namespace (A different namespace from the one we created above)
- Watch the Cloud Load Balancer create external access to the web app
- CURL the newly deployed web app to test manually
- Look at the logs of the web app
- Fix the broken web app deployment by deploying to the correct namespace
- CURL the web app again to test
- Start by doing a listing of the webapp directory ls -l django-app/ to see that it has similar files to the redis backend.
  $ ls -1 django-app/
  app.deployment.yml
  app.horizontal_pod_autoscaler.yml
  app.networkpolicy.yml
  app.service.yml
To deploy the basic webapp:
kubectl apply -f django-app/
This deploys all the yaml definitions in the django-app/ folder. Note that we are not defining the namespace in the metadata of the YAML, so it will default to the default namespace configured with kubectl.
  $ kubectl apply -f django-app/
  deployment.extensions/webapp created
  horizontalpodautoscaler.autoscaling/webapp created
  networkpolicy.networking.k8s.io/app created
  service/webapp created
Accessing Your Services:
Now you can take a look at the services available to see how you might actually access the webapp.
kubectl get services
You can see that you have both services attached to Redis which are ClusterIP services only accessible from within the cluster. You'll also see the third service, the webapp, which is exposed publicly because it's a load balancer service. When you list services, you get an external IP.
  $ kubectl get services
  NAME            TYPE           CLUSTER-IP   EXTERNAL-IP   PORT(S)        AGE
  webapp          LoadBalancer   10.16.58.188 <IP Address>  80:31550/TCP   97s
Please check with deployment with URL: http://<IP Address>:31550 or http://<IP Address>